In the age of smart home technology, even your bookshelf can be upgraded with a touch of innovation. A DIY smart bookshelf with mood lighting not only adds a functional and stylish piece to your space but also gives you the flexibility to customize the ambiance of your room with ease. Whether you are looking to set a cozy mood for reading or create a dynamic atmosphere for entertaining, a smart bookshelf with built-in lighting can elevate any space. Here’s how you can create one yourself.
Materials You’ll Need:
- Bookshelf – You can use any standard bookshelf that fits your space. Consider something with open shelves for the best effect.
- Smart LED Strip Lights – These are programmable LED strips that can be controlled via an app or voice assistant like Alexa or Google Assistant.
- Smart Plug or Hub – A smart plug will let you control your lights remotely, or you can use a hub if you want to connect all smart devices in your home.
- Power Drill and Screws – To mount the lights securely and fix any brackets.
- Cable Management Clips – These help to keep everything neat and tangle-free.
- Tape Measure and Scissors – For accurate measurements and cutting the LED strips.
- Optional: Smart Speaker or Voice Assistant – If you want to control your lighting via voice.
Step 1: Choosing the Right Bookshelf
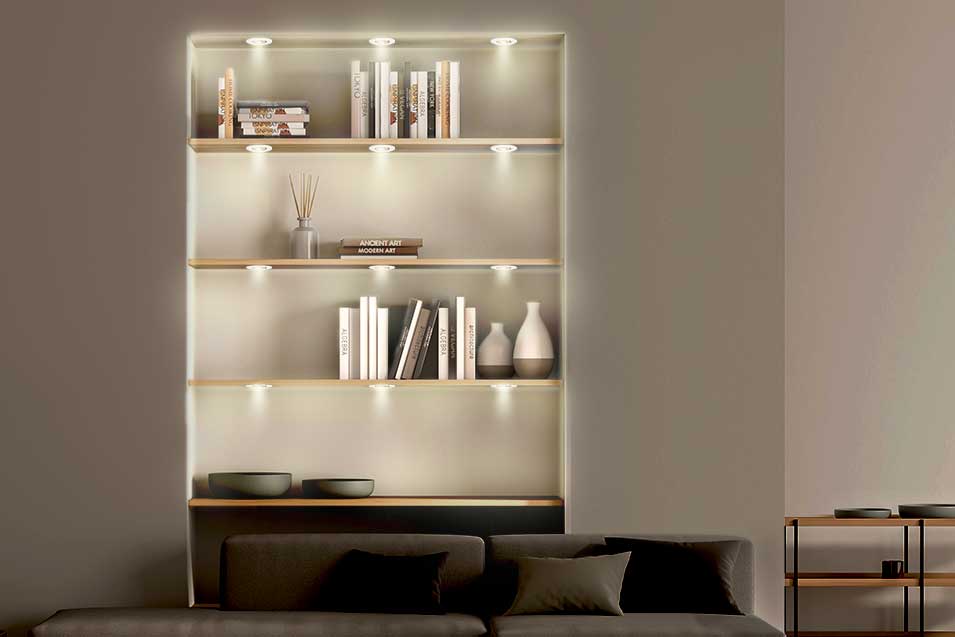
When selecting a bookshelf for your project, choose one that fits with your room’s style and provides enough space for your books, decorative items, and the necessary lighting. Open-shelved bookshelves work best for this DIY project since the lights will be more visible and have a greater effect. Make sure your bookshelf is sturdy enough to hold the LED strips and manage the cables effectively.
Step 2: Planning Your Lighting Layout
Before attaching the LED strips, take some time to plan how you want the lights to be placed. Do you want the lights to shine along the edges of the bookshelf or highlight certain sections of your collection? You can place LED strips underneath each shelf for a soft, ambient glow, or wrap them around the back to create more dramatic lighting effects.
Measure the length of the shelves to determine how much LED strip you will need. Most smart LED strips are flexible and can be cut to fit, making them easy to work with. You can find LED strips that are compatible with apps and voice assistants, which will allow you to control the colors, brightness, and even set schedules.
Step 3: Mounting the Smart LED Strips
Next, it’s time to install your LED strips. Start by cleaning the surface where you plan to mount the strips to ensure they adhere properly. Many smart LED strips come with an adhesive backing, so simply peel off the protective film and stick them along the edges of your bookshelf.
Use a power drill to make small holes where necessary, and secure any parts of the LED strips that require more stability, especially around corners or curves. For a neater look, you can use cable management clips to keep the wires out of sight and prevent any clutter behind the bookshelf.
Step 4: Setting Up the Smart Controls
Once the LED strips are in place, plug them into a smart plug or hub. Connect the hub to your Wi-Fi network or ensure your smart plug is paired with your home assistant. Depending on your lighting system, follow the manufacturer’s instructions to link your LED strips to the app or voice assistant.
After pairing, test the lights and experiment with different settings. Many apps for smart lighting will allow you to choose from millions of colors, set custom schedules, or create light moods that change based on the time of day. You can even program them to dim when you’re reading or brighten for a more vibrant effect when you’re entertaining.
Step 5: Final Touches and Customization
To enhance the functionality and aesthetics of your smart bookshelf, consider incorporating additional elements. For example, adding a set of shelves for plants or decorative items can make your bookshelf even more dynamic and visually appealing. You can also use other smart devices, like a voice assistant, to control your lights with simple voice commands such as “Hey Google, set the bookshelf lights to reading mode.”
If you’re feeling creative, integrate other smart technologies, like a motion sensor, that automatically adjusts the lighting when you approach the bookshelf. With smart integration, you can fine-tune every detail, ensuring your bookshelf fits perfectly into your daily routine and mood.
Step 6: Enjoy Your Smart Bookshelf
Now that your DIY smart bookshelf with mood lighting is complete, step back and enjoy the ambiance it brings to your room. Whether you’re settling in for a good read, relaxing after a long day, or hosting a gathering, your bookshelf will add both style and functionality to your space. You’ve not only created a practical storage solution, but you’ve also turned your bookshelf into an interactive feature in your home.
With smart lighting, you can transform your bookshelf into a dynamic, personalized feature that enhances the look and feel of your room, making it the perfect blend of technology and design. Happy DIYing!
Visit these links for similar information :
https://rent2010.net/
https://froglinks.org/
https://almenpar.net/
https://compagniefai.com/
https://colturidebucuresti.net/
https://cimots.com/
https://imbookingit.com/
https://arafeina.com/
https://sunglassesoutletsky.com/
https://bestcriminallawyerdelhi.com/
https://stephentyrone.com/
https://myexperttax.com/
https://therapinsider.com/
https://tabernaluciferina.com/
https://samdental.org/
https://claudiakarvan.net/
https://upcollective.org/
https://healthykidsnm.org/
https://ezycleanpest.com.au/
https://launchpadcreative.com.au/
https://directorypass.com/
https://travelntourism.org/
https://traveldistricts.com/
https://dvplegalconsultants.com/
https://dailyghnewsonline.com/
https://anhtutravel.com/
https://charlestonsfastcashhomebuyer.com/
https://trihc.com/
https://homedesignmaine.info/
https://lilihome.net/